Tuesday, September 21, 2010

Sushi!


I’ve come to the sushi game late in life.  When I was in Japan at the tender age of 19, I despised Japanese food and managed to go a full five days in a foreign country without consuming the local cuisine.  Really.  Now I’ve learned to love it, along with tomatoes and onions. 

On my small forays into the wonderful world of sushi, I’ve stayed rather conservative, choosing to purchase veggie or California rolls from the grocery store and avoiding raw fish altogether.  Yesterday while at the grocery store, I had the brilliant idea to make my own sushi.

The backbone of sushi is a red seaweed wrapper called nori that comes packaged in flat sheets.  Sea vegetables are notoriously healthy and contain almost all the minerals found in the ocean, including iodine, which supports thyroid function.  Nori is also high in calcium, folic acid, magnesium, iron, potassium, riboflavin and pantothenic acid.  Sea vegetables also contain lignan, a compound which inhibits inflammation.

Sushi can be made with brown or white rice, flavored with vinegar and sugar.  I suggest starting with white sushi rice because it’s slightly stickier and easier to manipulate.


Sushi Rice:
1 cup rise, thoroughly rinsed
1 cup water
1/8 cup rice vinegar
1/8 cup sugar
1 tsp salt

1.     Cook rice in water for 15-20 minutes or until water is completely absorbed.
2.     Combine rice vinegar, sugar and salt and microwave for 5-10 seconds, or until the sugar is dissolved.
3.     Remove rice from stove and combine with the vinegar/sugar mixture.  Cool slightly.


Sushi Ingredients:
You can use practically anything in sushi, including...
  • Sushi-grade raw fish
  • Smoked salmon
  • Crab
  • Cucumber
  • Cream cheese
  • Carrots
  • Avocado
  • Shiitake mushroom
  • Sesame seeds

Making Sushi:

Making sushi is best illustrated in pictures (as I have below), but is made infinitely easier with the flexible bamboo mat shown.

Spread the rice thinly over the nori, leaving a an inch or two for uncovered nori at the bottom to seal the sushi roll:
Spread the rice over the nori


Add the filling to the roll


Start rolling


Use the bamboo mat to help with the rolling


Roll tightly but gently

Seal with water

All rolled up!


Slice and enjoy!


Wednesday, September 8, 2010

Gluten-Free Gyoza (Potstickers)


Gyoza, or potstickers, have been an integral part of my adult life.  My husband and I bonded over these delicious morsels, and back in the day we ate frozen gyoza at least once a week.  They were our quick and easy go-to meal when we were too busy or tired to prepare dinner from scratch.  Sadly for both of us, no one makes frozen bags of gluten-free potstickers, and we’ve had to resort to making our own!

I will be the first to say that these gluten-free gyoza are not identical to the original, wheat-containing variety.  There just isn’t an easy way to simulate the traditional wheat wrappers without lots of different flours and much swearing.  Try if you must, but I’ve found that rice paper wrappers create a delectable little meat treat that I can dip in sauce and enjoy just like regular gyoza!

I like chicken potstickers but you can use pork if you prefer.  Making the filling can also be an undertaking, so I suggest doubling or tripling the recipe and then freezing the remainder in portions adequate to feed your family.  In this version, I’ve used chicken thighs that I ground in the Cuisinart (and slightly puréed on accident) but you can easily use pre-ground chicken from the grocery store.

I’ve tried many different sizes and shapes of rice paper wrapper and my current favorites are the six inch rounds, made of either tapioca or rice flour.  I will admit I went through about six months of trying to shape my gluten-free gyoza exactly like wheat pot-stickers, and I’ve come to the conclusion that it just isn’t going to happen with my current ingredients!  No matter, it all tastes the same.


Preparing the napa cabbage:

Shred in a food processor or chop finely by hand

Place in bowl and add about 1 teaspoon salt.  Let stand 15 minutes.  Run water over cabbage.

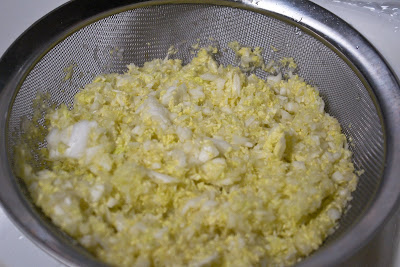
Scoop out with a fine mesh strainer, run under cold water and then squeeze out by hand.  The more water you remove, the better.

Preparing the filling:

Ingredients
~1.5 pounds ground chicken
~3 cups minced napa cabbage (see preparation instructions above)
4 medium scallions, white and green parts chopped
4 teaspoons gluten-free tamari
½ teaspoon dried ginger
1 medium clove garlic, minced
½ teaspoon hot pepper sesame oil
2 egg whites, lightly beaten


To Make the Filling:
1. Lightly beat egg whites in a large bowl and then add the remainder of the ingredients

2. Mix with a large spoon or with your hands and then refrigerate until ready to use


Rolling the gyoza:
Set-up is key. I’ve found that three plates with wrappers soaking in hot water makes the most sense. I roll the gyoza on the center plate, then transfer the rolled potsticker to a 5th plate to await cooking. Roll as seen in the pictures below.


Fry the gyoza in a little bit of oil on medium heat for about 7 minutes on each side.  The drier the napa cabbage, the less leakage you'll get during cooking, and the less brown the final product will be.  The parts that appear burned are really just excess browning from the juices.


Preparing the sauce:
Mix together:
2 tablespoons gluten-free tamari
2 tablespoons brown rice vinegar
1 tablespoon mirin
Hot pepper oil to taste


...and the finished result:
 

Enjoy!  Serve with the vegetable of your choice!

Disclaimer:  I do not support or sell the brand names shown in the photos above, those are simply the ingredients I have on hand.

Thursday, September 2, 2010

Cook! Eat what you love!


How often do you eat exactly what you want?  I’m not talking about coming home at the end of an exhausting day and ordering a pizza because it’s easy and your food expectations can be met with a simple delivery service.  I’m talking about letting your taste buds do the thinking and actually cooking what your heart desires.  Mom’s lasagna with Caesar salad and crusty bread.  Chicken soup.  Shirmp phad thai.

Healthy eating isn’t about calories and grams of fat.  It’s about eating what tastes good to you and cooking at home.  I guarantee that any food you prepare in your own kitchen will be much better for you than anything you buy in a restaurant.  If you’re cooking, you’ve taken the time to purchase quality ingredients -- and although many restaurants try to do the same, they are thinking of their bottom line and not your health.


The mantra of restaurant food is fat, sugar and salt.  You can make literally anything taste good with those three ingredients.  Deep-fried cardboard tastes wonderful when adequately salted and dipped in a nice sweet barbeque sauce.

When you cook, are all your foods golden brown?  If the answer is no, then you have done what most restaurants cannot or will not.  Whether or not a person cooks is often a predictor of developing diseases such as heart disease and diabetes.
What meal have you made at home today?


Yesterday, I came home and had a craving for roast chicken, which is not a typical mid-week meal in this house!  I just so happened to have a free-range chicken my mother-in-law gave me, so I threw it in a salt water brine and went about planning the rest of the meal.

Unintentionally, I ended up with a nearly white meal. In food service this is a horrible faux pas, but at home it just means I need to use a colorful plate!  I cooked and washed dishes (no dishwasher here) for about two hours and served up a delicious meal of roasted chicken rubbed with fresh herbs and butter, risotto and sautéed summer squash.


Eating should be a pleasure, not a chore.  Good food does not require you to cook for hours, but if you do happen to immerse yourself in a cooking, project, consider the time well-spent.  Your family and your body will thank you!